Reverse parallel parking…
This is one of the manoeuvres you may be asked to perform on
your driving test. You will perform this exercise behind one vehicle and not
between two, so that makes it a lot easier! It’s really not as difficult as you might think! Here are
some guidelines you may find useful…
First, let me explain what will happen if you get asked to
do this whilst on your driving test. The examiner will ask you to park on the
left, some distance from the car in front. He will then explain to you what he
expects you to do, and it will go something like this…
“I’d like you to pull up alongside the yellow car and then
reverse park behind it. Try not to touch the kerb.”
Sounds simple doesn’t it? And it is! This is how I teach my learners...

1 - For your starting position, pull up parallel and
approximately 2/3 of a meter away from the yellow car. Aim to get your door
mirror level with the nose of the yellow car as in diagram A. Once stopped apply the handbrake (if necessary)
and select reverse gear. This means you are signalling to other road users what
your intentions are. Before moving the car in reverse, take appropriate
observation; this means a good all round check, and, most important, a proper
blind spot check. If it is all clear,
very slowly reverse the car, using clutch control. Aim to go as slow as a snail
dragging a stone! That way, you are in full control, and can easily stop if
necessary.
2 - Looking out of the rear window, slowly reverse until the
rear of your car is level with the rear of the yellow car (bum to bum!).
Keeping continuous observation, you must stop your car if any cars or cyclists
approach at a reasonable close range. Once they have passed, you can continue. Remember
to look out of the back and the side window, as it is important that you are
always looking in the direction of travel.
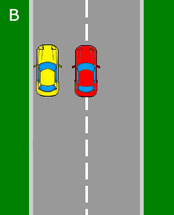
Once the rear of your car is level with the rear of the car
you are parking behind, as in diagram B, re-check your blind spot and then get
your car just moving and then turn the steering wheel briskly one complete turn
to the left (360 degrees). This will put your car at a 45 degree angle.
Continue to look out the rear windscreen as this is the way you are traveling
as well as in front and also down the road looking out your driver seat window.
Effective observation must be continuously made. Many tests are failed due to
this.

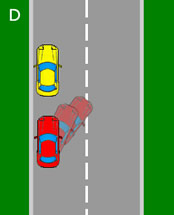
Once you have reached the point in diagram C, (where the
door mirror of your car is level with the yellow car’s rear) pause, recheck
your blind spot, and then get the car just moving before turning the steering
wheel one whole turn to the right (360 degrees). This will make sure your front
wheels are now straight.
3 – The next part will take some practice to get it exactly
right! In my car, I have a reliable “reference point” to help learners. (Every
car will have a different reference point; mine is where the top of the door
handle lines up with the top of the curb). What you need to do now is to slowly reverse
back until your reference point is in the right place, and then put full lock
onto the right as quickly as you can. If you don’t have a reference point, aim
to get your rear tyre about 1 foot from the curb…and then apply full lock. This
will swing the front of the car towards the curb. Make sure you keep an eye on
the front of the car so the back of the front wheel does not hit the curb. Once
you are nearly parallel with the curb straighten out the wheels. Ensure you are
not parked too far into the road. If so correct your position by slowly
continuing to reverse if there isn't enough room to move forward. As long as
you are parked within two car lengths, that will be fine!
The other thing to remember is that if you get it wrong, don’t
give up! Try to correct the situation, just as you would in real life…
And now onto my lesson with Megan, who has been practising
this manoeuvre… As she has her test booked and coming up fairly soon, I felt it
would be good to challenge her, and make her park between two cars! She had not
done this before, but was willing to have a go!

The first photo shows the view she had out of her rear
window! She found it really difficult to judge exactly how far away the white
car was, so I suggested she got out of the car to have a look. At first she
gave me a really funny look, but when she did, she realised that she had
approximately four feet between her and the white car! I know it might not
always be appropriate to get out of the car, but it really does help the brain
to gauge things a lot better, so I always get my learners to do this…

The second photo is the final result…and when she realised
what she had achieved, she said “Coolio”!! Absolutely brilliant result Megan; a
real confidence booster!! I just have to add, (for all you eagle eyed readers!), that of course, she would then pull forward and straighten her front wheels...
Helen Adams ADI
No comments:
Post a Comment